
The Nimzowitsch Counter-Gambit, arising after the sequence 1.e4 e5 2.f4 d5 3.exd5 c6, represents one of the most robust and principled methods of meeting the King’s Gambit. Originally conceived as an offshoot of the Falkbeer Counter-Gambit, this system has evolved to become arguably more respectable than its parent.
By striking at the center and offering a pawn to open lines immediately, Black aims to generate a significant lead in development and exploit the inherent airy nature of White’s kingside. Unlike the Falkbeer, where the e-pawn often becomes a target or a liability, the Nimzowitsch Counter-Gambit focuses on rapid piece activity and the creation of concrete tactical problems for White to solve before they can consolidate.
The strategic heart of this variation is a battle between White’s material greed and Black’s dynamic compensation. White is presented with an immediate choice: should they attempt to maintain the extra pawn at the cost of developmental lag, or should they prioritize the safety of their king and the activity of their pieces?
The Sideline 4.Qe2
Before delving into the theoretical main lines, it is necessary to address the sideline 4.Qe2.
While this move has been tested by various masters, it is generally regarded as a somewhat greedy and clumsy approach. White attempts to bag the pawn and hold onto it, but in doing so, they turn from a gambiteer into a defensive pawn-grabber.
4.Qe2 cxd5
This is Black’s most common response. By simplifying the center, Black highlights the awkward placement of the white queen.
5.fxe5
White must capture here, as continuing the queen’s adventures with 5.Qxe5+? Be7! leads to disaster.
With the disappearance of the e5-pawn, White’s f2-f4 move becomes a pointless weakness. A famous tactical trap exists here: if White plays 6.Qxg7??, Black has 6…Bf6 7.Qg3 Bh4, winning the queen. This motif is a valuable reminder of the dangers White faces when neglecting development in favor of material.
Instead of 4…cxd5, Black has the highly effective and perhaps superior alternative:
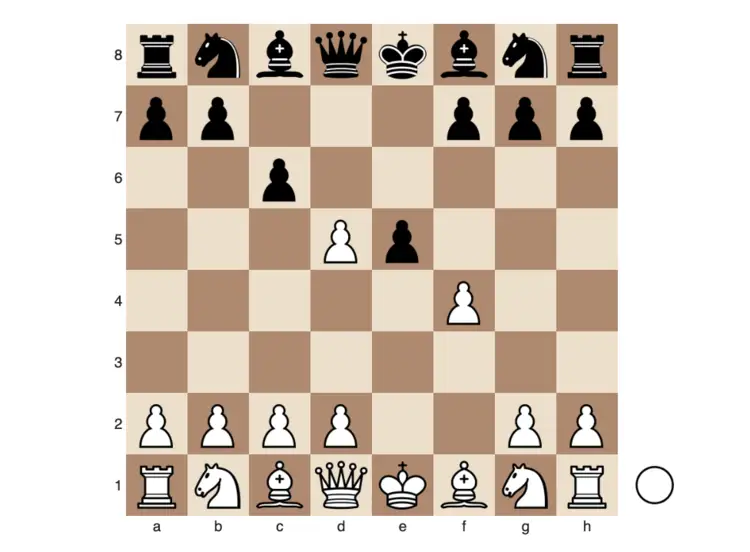
4.Qe2 e4!?
This move effectively paralyzes White’s kingside development and is at least as strong as the main line.
5.Qxe4+ Be7
White has won a pawn, but at what cost? Black is ready to strike in the center with …cxd5.
6.d6
Trying to douse the fire by returning the pawn is a sensible practical choice. If White tries to hold the material with 6.dxc6?!, Black’s development becomes overwhelming after 6…Nxc6 7.c3 Nf6 8.Qc2 0-0 9.Nf3 Bc5!. Black lines up a piece sacrifice on f2 or e3, and White’s king will find no safety.
6…Qxd6 7.Nf3 Nf6 8.Qe5 0-0
Black has achieved full compensation. In such positions, the f4-pawn often makes no sense and merely leaves weak squares at e4 and g4. This remains true even if queens are exchanged; Black’s activity is a permanent asset.
The Principled Development 4.Nc3
Modern theory has correctly identified 4.Nc3! as the most accurate response to the Nimzowitsch Counter-Gambit. White focuses on developing a piece and controlling the center rather than immediate pawn-grabbing. From this position, Black has two main ways to proceed: the immediate recapture with 4…cxd5 or the more complex 4…exf4.
The Inferior Recapture: 4.Nc3 cxd5
While 4…cxd5 is a natural move, it allows White to demonstrate a clear path to an advantage.
1.e4 e5 2.f4 d5 3.exd5 c6 4.Nc3 cxd5 5.fxe5 d4
Black attempts to gain space and drive the knight away, but White has a subtle tactical response.
6.Bb5+!
This check is a critical move-order nuance. It forces Black to clarify the position of their minor pieces before White commits their own.
6…Nc6
If 6…Bd7, White plays 7.Bxd7+ Nxd7 8.Ne4.
Now, if Black plays the aggressive 8…Qh4+, White has the calm 9.Ng3 Nxe5 10.Qe2!. White maintains an edge by aiming for a favorable endgame where the superior pawn structure will tell.
7.Ne4 Qd5 8.Qe2 Bf5 9.Bxc6+ bxc6 10.d3
White has emerged with an extra pawn and a solid position. Black’s lead in development is real, but it is not enough to compensate for the structural damage and the missing material. White will continue with Nf3, 0-0, and gradually exploit their material advantage.
The Main Line: 4.Nc3 exf4
This is the true testing ground of the Nimzowitsch Counter-Gambit. Black strike for activity and prepares to challenge White’s center.
5.Nf3 Bd6 6.d4 Ne7
We have reached the most important theoretical tabiya of the system. Black has a solid setup, but White’s central control provides the basis for their compensation. At this point, White must choose between two schemes of development: the inaccurate 7.Bc4 and the superior 7.dxc6.
The Battle over Move 7
The Inaccuracy: 7.Bc4
For many years, 7.Bc4 was the standard choice, but it needlessly gives Black extra options.
7.Bc4 0-0 8.0-0 Ng6
Black develops with a gain of tempo. Now, White often attempts to force the play with a sharp tactical idea.
9.Ne4 Bc7 10.d6 Bxd6 11.Nfg5 h6
Asking for trouble.
12.Nxf7! Rxf7 13.Bxf7 Kxf7
White has a crushing attack.
14.Qh5!
Black is dead.
The Refutation: 7.dxc6!
White should favor this exchange, as it forces Black’s knight to the b6-square (after a subsequent Bc4) or forces a recapture that accelerates Black’s development but clarifies the pawn structure in White’s favor.
7.dxc6 Nbxc6 8.Bc4 0-0 9.0-0 Bg4
We have reached a critical juncture. The pawn structure is unbalanced: White has a 4-2 majority on the queenside, while Black has a 4-2 majority on the kingside.
10.Ne4!
White targets the d6-bishop and prepares to consolidate.
10…Bc7
Black must preserve the bishop, but now White can focus on their long-term strategic goals.
11.c3
White anchors the center. The position is dynamically balanced, but White has several long-term trumps. In an endgame, White’s queenside majority is generally more functional than Black’s kingside majority, as the absence of the f-pawn makes the white king vulnerable in the middlegame but potentially active in a technical ending.
Positional Themes and Attacking Plans
In the main lines of the Nimzowitsch Counter-Gambit, both sides must adhere to specific strategic imperatives.
White’s Objectives:
- Consolidate the Center: The d4 and c3 pawns are the bedrock of White’s position. If these pawns are successfully maintained, White can use them to restrict Black’s minor pieces.
- Utilize the Bishop Pair: In many lines, White ends up with the bishop pair against Black’s knight and bishop. White must strive to open the position to allow these bishops to exert their full influence.
- Endgame Superiority: White should not fear queen exchanges. As previously noted, the 4-2 queenside majority is a potent weapon in technical phases of the game.
- The f-file Conduit: After castling, the rook on f1 can become a powerful attacking piece, especially if White can arrange the f4-f5 push or exploit the half-open file after Black has captured on f4.
Black’s Objectives:
- Maintain Pressure: Black must use their lead in development to create immediate threats. If the game becomes quiet, White’s structural advantages will take over.
- The …f3 Advance: A recurring tactical theme for Black is the advance of the f-pawn to f3. This “hook” can disrupt White’s coordination and create permanent weaknesses around the white king.
- Target the d4-pawn: The d4-pawn is often the only thing standing between Black’s pieces and the white king. Sacrifices on d4 (often involving …Nxd4) are common and must be calculated deeply.
- Dark-Square Control: Because White often exchanges their light-squared bishop (the Bc4 takes on c6 or is exchanged on d5), Black can often gain control over the dark squares in the center and kingside.
Common Mistakes and Move-Order Nuances
The Nimzowitsch Counter-Gambit is an opening of extreme sensitivity to move orders. A single inaccuracy can turn a promising initiative into a lost position.
Common Error for White:
- Rushing the Attack: White often feels compelled to launch a direct assault on the black king before their own position is secure. Moves like 12.Nfg5?! in the 7.Bc4 line are classic examples of this over-optimism.
Common Error for Black:
- Delaying …g5: In lines where White plays h2-h4, Black must be ready to respond with …h6 and …g5 immediately. Allowing White to play hxg5 followed by a doubling on the h-file is usually fatal.
- Misplacing the Queen: The queen is often better off on d6 or f6 than on e7. On e7, she is frequently a target for Ne4 or Nb5 maneuvers.
Strategic Middlegame Transitions
Transitions to the middlegame in the Nimzowitsch Counter-Gambit are characterized by high tension. White will often offer the f4-pawn back to gain time or to trade off Black’s most active pieces.
A critical maneuver to watch for is White’s Kh1 followed by Rg1. This prophylaxis allows White to step off the f-file (where Black’s queen or rooks may be aiming) and prepare their own kingside push with g2-g3.
Conversely, Black often looks for …Rae8 and …Nd4 ideas. If Black can establish a knight on d4 that cannot be easily challenged by c2-c3, White’s center will collapse.
Endgame Tendencies
If the queens are exchanged, the game enters a technical phase where White is generally favored. The 4-2 pawn majority on the queenside is “healthy,” meaning the pawns are not doubled or isolated. Black’s 4-2 majority on the kingside, however, is often compromised by the doubled f-pawns or the displacement of the king.
In these endgames, White’s king often proves to be a surprisingly active piece. Having been forced to f1 or e2 in the opening, the king is already centralized and ready to support the advance of the d- and c-pawns.
Conclusion
The Nimzowitsch Counter-Gambit is a formidable weapon for the aggressive player. It forces White to play with precision from the very first moves and punishes greed or passivity with equal severity. However, modern analysis has shown that if White is prepared to navigate the tactical minefields and prioritize solid development over immediate material gains, they can secure a stable positional advantage. The key for both sides is to recognize the shifting balance between dynamic and static factors; in the Nimzowitsch Counter-Gambit, the one who understands this balance best will almost certainly emerge victorious.

I’m Xuan Binh, the founder of Attacking Chess, and the Deputy Head of Communications at the Vietnam Chess Federation (VCF). My chess.com and lichess rating is above 2300. Send me a challenge or message via Lichess. Follow me on Twitter (X) or Facebook.