
The Evans Gambit is a sharp branch of the Italian Game that starts with an early pawn sacrifice: 4. b4. The idea dates back to the 1820s, when Captain William Davies Evans introduced it into practice. The goal is clear. White gives a pawn to gain time, open lines, and accelerate development.
The opening has been used at the highest level by players such as Garry Kasparov and Bobby Fischer. The positions are open, tactical, and often decided quickly if one side misplays the opening phase.
This guide lists 10 common traps in the Evans Gambit, with exact lines preserved.
1. The “Compromised Defense” Greedy Trap
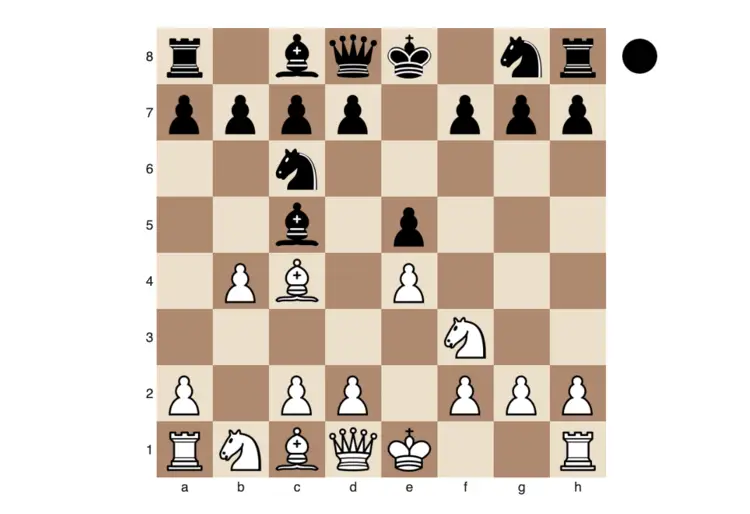
The most common reaction to the Evans Gambit is for Black to accept the pawn and then try to hold onto it with everything they have. This often leads to the Compromised Defense, where Black captures three pawns in total. After 1. e4 e5 2. Nf3 Nc6 3. Bc4 Bc5 4. b4 Bxb4 5. c3 Ba5 6. d4 exd4 7. O-O, Black plays 7… dxc3?.
White’s response is the clinical 8. Qb3!, creating a battery against f7 and forking the opportunity to regain the pawn.
If Black tries to defend with 8… Qe7, they are already in trouble. White plays 9. Nxc3, and if Black tries to simplify with 9… Bxc3 10. Qxc3 Nf6, White develops with tempo via 11. Ba3!.
The trap snaps shut if Black tries to be clever with 11… Nxe4?. White plays 12. Qxg7, and suddenly Black’s house is on fire as the rook and the king are under fire.
2. The “Brave Knight” Blunder (7… Nf6)
In many variations of the Italian Game, developing the knight to f6 is the most natural move on the board. In the Evans, however, it can be a death sentence if played at the wrong moment. After the standard moves leading to 7. O-O, if Black plays 7… Nf6, White immediately hits them with 8. e5!.
This move expands in the center and forces the knight into a miserable choice. If the knight retreats to g8, White plays 9. Qb3, and after 9… Qe7 10. Ba3, Black is completely crushed.
If the knight tries to get active with 8… Ng4, White simply plays 9. Bg5, and Black’s development is a mess with the king likely stuck in the center.
Even the move 8… Ne4 fails to 9. Qe2, which almost traps the knight right in the middle of the board.
3. The d5 Bishop Snare
This is a sophisticated “hidden” trap that occurs in the Ba5 variation. Many Black players assume that as long as they have their bishop on a5, it is safe from harm. However, White often uses the d5 push to create a tactical overload.
In one common line, Black plays 7… Qe7 to defend f7.
White plays 8. d5!, which seems to just attack the knight on c6. But there is a deeper point: the knight on c6 is the only thing guarding the bishop on a5. After the knight moves, for example 8… Nb8, White plays 9. Qb5+ (or Qa4+), forking the king and the unprotected bishop on a5. Just like that, White is up a full piece.
4. The 5… Nxb4? Beginner’s Trap
One of the most common mistakes beginners make is capturing the b4 pawn with the knight instead of the bishop. After 4. b4 Nxb4?!, White plays 5. c3, kicking the knight immediately.
The problem for Black is that White gets the ideal center for free. If the knight retreats to c6, White follows up with 6. d4 exd4 7. O-O d6. White has a massive lead in development and total control of the center.
Even worse is 5… Na6?, which allows 6. Nxe5, immediately threatening the f7 pawn and leaving Black in a position that the computer evaluates as nearly winning for White.
5. The “Pinned Pawn” Illusion
In the Pin Variation (5… Ba5), White plays 6. d4. Black often plays 6… exd4, thinking they have won another pawn because the c3 pawn is pinned to the White king. This is exactly what White wants you to think.
White’s star move here is 7. O-O!!, completely ignoring the pin. If Black continues to be “greedy” with 7… dxc3, they fall into the same Qb3 trap mentioned earlier.
By castling, White removes the pin and prepares to use the open e-file to hunt the Black king. As one annotator puts it, “White will get great attacking potential… don’t try it unless you know your theory though!”.
6. The “Cautious” 7… d6 Mistake
Some Black players try to play “solidly” with 7… d6, avoiding the chaos of the double-pawn gambit. Unfortunately, in the Evans, “solid” often translates to “too slow”. White responds with the ubiquitous 8. Qb3, targeting f7.
After 8… Qe7, White plays 9. e5!, offering a pawn to rip open the center.
If Black takes with 9… dxe5, White recaptures with 10. cxd4, and if Black tries to keep the e-file closed with 10… e4, White jumps in with 11. Ne5!. The pressure on f7 and the d-file becomes unbearable. In many games, Black is forced to trade their best pieces just to survive the initial onslaught, often ending up in a lost endgame.
7. The Ba3/Ba6 “Berlin Wall” Trap
The Evans Gambit isn’t just about direct attacks; it’s about prevention. One of the primary goals of the 4. b4 sacrifice is to clear the a3-f8 diagonal for the dark-squared bishop.
By placing the bishop on a3 (sometimes referred to as the a6 square in different notations or contexts), White can effectively prevent the Black king from ever castling. A classic example occurs in the Nge7 variation: 10. Ba3.
If Black tries to block this with 10… Bb4 to sneak into castling, White has a crushing tactical response: 11. Bxd5! Qxd5 12. Bxb4 Nxb4 13. Qe1+. This simple check picks up the knight on b4, leaving White up a piece and Black’s king still stranded in the center.
8. The f7-h7 Queen Fork
This trap preys on Black’s desire to develop their kingside pieces as quickly as possible. After the center is somewhat stabilized, Black often plays 7… Nge7, preparing to castle.
White can punish this with the aggressive 10. Ng5!.
While Black can castle here (10… O-O), it allows the devastating 11. Qh5!. This is a double fork on the f7 and h7 pawns. Because Black’s knight is on e7 instead of f6, it cannot defend h7. White will either win material or launch a mating attack that is nearly impossible to defend in a blitz game.
9. The Fischer-Fine “Special” (17. Qg3!!)
No blog post on Evans Gambit traps would be complete without mentioning the legendary game between Bobby Fischer and Reuben Fine in 1963. This game features a trap that occurs in the Compromised Defense after 10. Nd5!.
Fischer showed that even against a world-class grandmaster, the Evans can be lethal. After a series of forced moves, the position reached a climax where Fischer played the stunning 17. Qg3!!. Black resigned immediately. The trap is that if Black takes the queen, they are checkmated; if they don’t, they lose their own queen or face a forced mate anyway. It is a masterclass in how White’s lead in development can be converted into a sudden, game-ending tactical blow.
10. The g7 “Ghost” Pawn Nightmare
In the Brave Knight variation (7… Nf6 8. e5 d5 9. exf6 dxc4), a very strange position arises where a White pawn reaches g7. Many Black players think this pawn is weak and can be picked up later, but it actually acts as a “bone in the throat” for the Black king.
After 10. fxg7 Rg8 11. Re1+ Be6 12. Bg5, Black is essentially playing without their kingside. The rook on g8 is stuck defending the g7 pawn, and the king has no safe harbor. In many master games, such as those played by Paul Morphy, this g7 pawn becomes the anchor for a winning combination, as it keeps the Black king paralyzed while White’s other pieces swarm the center.
Why the Evans Gambit Works
The Evans Gambit is based on time and activity. White sacrifices a pawn to:
- Gain faster development
- Open central files
- Target f7 early
Even without traps, White often keeps better piece activity and space.
Practical Tips
1. Do not focus on material
The pawn sacrifice is intentional. Time and development matter more.
2. Target f7
Most attacks revolve around this square.
3. Keep the king in the center
Use bishops on a3–f8 and h1–a8 diagonals to restrict Black’s king.

I’m Xuan Binh, the founder of Attacking Chess, and the Deputy Head of Communications at the Vietnam Chess Federation (VCF). My chess.com and lichess rating is above 2300. Send me a challenge or message via Lichess. Follow me on Twitter (X) or Facebook.