
Zugzwang is a German term describing a situation where the player whose turn it is to move is at a disadvantage. Any move they make worsens their position or leads to material loss. If the same position were reached and it was the opponent’s turn instead, the player might be completely fine.
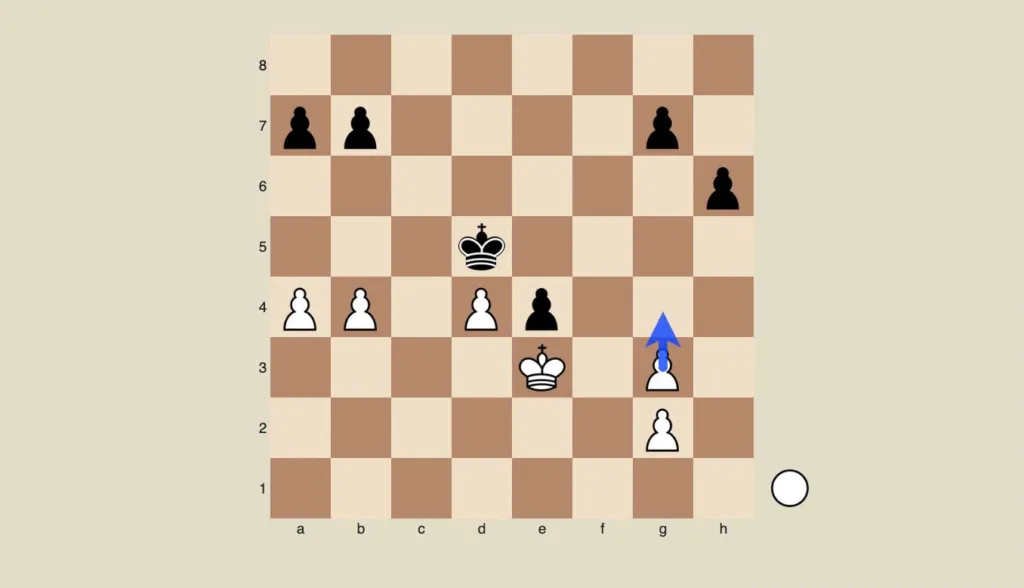
Taylor–Lasker, 1936
In this classic example, Black played the brilliant 1…a5!, placing White in a bind where every possible move loses material.
- The queen cannot move without allowing the knight to fall.
- Any pawn push results in a loss of material.
- If the knight moves, White loses both the d4 and c5 pawns.
Play continued:
2. b4 ab4 3. b3, and after 3…Kh6!, White resigned. He was in a textbook case of Zugzwang again.
Many young players are focused on direct attacks—snatching material or delivering checkmate. Even when the opportunity to win by Zugzwang is present, they often miss it, preferring a more aggressive, tactical approach. Yet in many endgames, particularly in king and pawn endings, Zugzwang is the only path to victory.
Consider this basic example:
White: King on d6, Pawn on e6
Black: King on d8
Black to move is in Zugzwang. Any move he makes will give up critical squares and allow the white king to advance. In such endgames, Zugzwang often manifests as “the opposition”—when one player forces the other to move and give ground.
Fischer–Rosetto, 1959
This is a textbook example of Zugzwang. Whatever Black does, he’s doomed.
- If 1…Kf6, then 2 Rb8 Rc7 3 Rf8 wins the knight.
- If the king moves elsewhere, it loses contact with the knight, and the same sequence follows.
- If the knight moves, then Be6 wins.
- If the rook moves, then c7–c8=Q+ and White promotes with check.
No matter what, Black is helpless. A beautiful example of Zugzwang.
Alekhine–Nimzowitsch, 1930
1 Ba4!
White threatens 2 b5, forcing Black to sacrifice a pawn to avoid losing a piece.
- 1…b5 2 Bb5 Ke8 3 Ba4 Kd8
The black king rushes to defend c7, but now Alekhine spots something crucial: All of Black’s pieces are frozen, tied down to defending either c6 or c7. None can untangle the position.
White calmly played 4 h4!, nudging Black into Zugzwang. Black has only a few pawn moves left on the kingside. Once they run out, White can shuffle his king back and forth until Black runs out of options and is forced to make a losing move. Nimzowitsch soon resigned.
Skuia Study
In this endgame study, White is a pawn down. But with precise play and a clever Zugzwang idea, he can draw.
- 1 Kf5 Kg7 2 e7 Kf7 3 e8=Q+ Ke8 4 Ke6!
Note:
- If 4 Kf6, then 4…Kd7 5 Kf6 Kc6 6 Ke4 Kc5 7 Kd3 Kd5 8 Ke3 Kc4 9 Kd2 Kd4, and Black marches his king in front of the pawn to win.
But with 4 Ke6!, White sets a trap:
- If 4…Kf8, then 5 Kf8
- If 4…Kd8, then 5 Kd6
- If 4…f5, then 5 Kf5
- If 4…d5, then 5 Kd5
In each case, White neutralizes Black’s threats by keeping the black king from stepping in front of its last pawn. The game ends in a draw.
Popov–Denkov, 1978
This final example is a common pattern in king and pawn endings.
Both sides have kings and central pawns—White’s king on e3, pawn on d4; Black’s king on d5, pawn on e4. It’s a mutual Zugzwang: Whoever has to move first loses their pawn. A reminder that in endgames, Zugzwang isn’t rare—it’s often decisive.
1. g4!
This creates several possible lines:
A. 1… a6 2. a5 g6 (or 2… g5 3. g3) 3. g5!! hxg5 4. g4 Kd6 5. Ke4 Ke6 6. d5
B. 1… g5 2. g3
C. 1… b6 2. b5 g6 3. g5!! hxg5 (or 3… h5 4. g3) 4. g4
D. 1… g6 2. g5!!
Exercise
The following position is a composition by Paoli
White to play and win. This is a difficult problem with the theme of Zugzwang.
Solution
- e4!! Bxe4
- Kf7! Ke2
- Ke6 Ke3
- B moves along the h1–a8 diagonal
- f5 wins
Also, if 4… f4, then:
4. Ke5! and Black is in zugzwang.
- For example, if the bishop moves along the b1–h7 diagonal, then 5. d5 wins.
- If instead 4… Kd3, then 5. d5 again.
- Or if 4… Kf3, then 5. f5 wins.
One sample line:
4… Bc2
5. d5 Ba4
6. d6 Bd7
7. f5 Kg3
8. fxg6
9. d7 Bxd7
10. f7
To sum up
Zugzwang (say it with me: tsoog-tsvahng) is the rare chess situation where you don’t want to move. You’d rather pass, stay put, or just fake a bad internet connection. Why? Because every legal move makes your position worse.
The term comes from German, meaning “compulsion to move.” And that’s exactly the problem: in chess, you have to move on your turn. You can’t skip it. You can’t say, “Actually, I’m good. Your turn again!”
When you’re in zugzwang, you’re stuck. Imagine a tightrope walker who must take one step forward—right into a pit of alligators. That’s zugzwang in a nutshell.
Using Zugzwang to Your Advantage
Zugzwang isn’t just something that happens to you—it’s something you can create. The secret? Force your opponent into a position where moving will hurt them. Here’s how:
- Control Key Squares: Dominate critical spaces so your opponent’s king or pieces have nowhere useful to go.
- Advance Strategically: Push pawns or position pieces to lock your opponent in a zugzwang zone.
Calculate Ahead: Zugzwang is a long-term plan, not a lucky break. Spotting it requires looking several moves into the future.
Zugzwang in Everyday Life
Believe it or not, zugzwang doesn’t just happen on a chessboard. You’ve probably experienced it in real life too:
- At Work: Your boss asks if you want to take on a new project or “help out” on another one. Either way, you’re stuck with extra work.
- In Relationships: Your partner asks, “Do you notice anything different about me?” Say no, and you’re in trouble. Say yes, and you better hope you guessed right.
- In Gaming: You’re down to your last life, and any move leads to defeat. Sound familiar? That’s zugzwang.
I’m the senior editor of Attacking Chess, a keen chess player, rated above 2300 in chess.com. You can challenge me or asking questions at Chess.com.
1 thought on “Zugzwang: When Moving Is a Curse”
Comments are closed.